The Sims™ 3 Create a World Tool – Beta WalkThrough
Greetings!
I’m La Shawn (aka Rain), the lead producer of The Sims™ 3 Create a World Tool – Beta, and I wanted to give you a little walk-though to get you started on the right track, and give you some things to think about, when creating a town using The Sims™ 3 Create a World Tool – Beta.
- Story-time – Before you start working on your town you should think of the story you want to tell. Some questions to ask yourself are:
- What will the town look like? Will it be mountainous, desert-like, lush, alien, a small farming community or all of the above?
- How large will your world be? Do you have the time to make a vast world that doesn’t seem sparse? Keep in mind, the smaller the world, the better it will run on other player’s machines if you’re going to share it on the Exchange.
- How many Sims will live in your world? You’ll need to have enough lots for all the families that you’d like to live there and a few extra lots for NPCs.
- What rabbitholes and venues will you include? You should include many of the rabbitholes (such as the School, Theatre and Store) as these places provide jobs, classes and events (and school) for the Sims that will live there. Will your town also have a library, a gym, an art gallery? You’ll need Lots to place all of these locations on.
- Tackling the terrain
- Start a new world and select a height map as your starting point. You can start with one of our default maps (flat maps of various sizes and heights), one of the pre-shaped maps provided (all are of 200 height and varying sizes), or create your own height map by importing a .png file. Don’t forget to adjust the Maximum Height of your new world, especially if you’re choosing one of the provided maps. The Maximum Height determines how tall your mountains and how deep your valleys can be. The shorter the height the better the performance of your world, but if you want tall mountains, you’ll need a greater Maximum Height – it’s your choice! You’ll also need to choose whether your default terrain paint is Lush (grassy) or Desert (sandy). You can always choose to add or change these terrain paints later.
- Decide where you want the sun to rise and set in your world (by going to the View > Time of Day menu in the tool and changing the Speed of Time Passage to see where the sun currently rises and sets) and build your world with this in mind. Once you’ve started altering your terrain, you won’t be able to rotate the world or the sky to change this. Pick a picturesque location for the sunset (such as behind a mountain range or over the ocean) – it will really bring out the beauty in your world.
- Use the Terrain Sculpting tools to mold your terrain into what you want it to be – keeping in mind the ideas that you’ve come up with in Step 1. Play around with the brush settings and modifiers until you come up with something that you like. You can also undo any changes, to experiment with ease. Sometimes it’s easier to get a general overview of your entire world first, then come back to perfect the terrain in certain areas later.
- Determine where you want the height of your water to be by using the Change Sea Level button. You only need to press the button, then click somewhere on your terrain to raise or lower the water to that level.
- Time for Terrain Paint
- You can paint your terrain with the Terrain Painting Tools similar to how you paint terrain in the game. Select the terrain paint and use the modifiers to determine the size, opacity and falloff of your brush. While seeming easy on the surface, the terrain painting tools require a bit of practice to use them to their full extent. Unlike the game, these terrain tools are layered, which can make the results seem somewhat unpredictable.
- You can use the Auto-Paint tool to paint the mountains a rocky color (you can also replace the rocky color with something else if you like). Even when using Auto-Paint, you’ll have to go over them to get the details the way you want them. Auto-Paint basically takes the first and second terrain layers and uses them to paint the town according to height.
- The Road to Somewhere
- The locations of your roads and sidewalks are very important to gameplay. If you have no roads in your town, your Sims won’t use cars or bicycles (and this includes NPC Sims such as the Pizza Delivery Person and the Firefighters). If your roads are few and far between, it will take your Sims a long time to get places. You want to try and balance the locations of the roads with what can be found near them. This is especially critical when placing spawners (which is discussed later).
- When laying out your roads and sidewalks, think about where the intersections will go from the beginning. It will take more time (and require you to break off pieces of roads) to fit them in later. Intersections go between (and at the end of) road pieces or sidewalks, and make it so that cars can turn around and crosswalk lines appear on the roads. Intersections cannot go on top of roads or sidewalks. It’s best to give your roads a number of breakpoints in them so that they are more adjustable later. You can do this by placing your road and dragging and clicking intermittently instead of dragging really long pieces of road and then clicking.
- You can create custom road textures (using a paint program) and use them to create custom roads for your town. We’ve also provided a few textures that can be used to create a custom road and sidewalk. Please note that the custom roads don’t yet play well with intersections, so you may want to avoid placing intersections pieces in this case. Here is the guide for which textures to put in for creating a custom dirt road using the textures provided with CaW:
Dirt Road
- Street Textures:
Base Texture dirt_street_base.dds
Detail Texture dirt_street_detail.dds - Sidewalk Textures:
Base Texture dirt_sidewalk_base.dds
Normal Map dirt_sidewalk_base_n.tga
Opacity Map dirt_street_opacity.dds - Intersection Textures:
Corner Texture dirt_intersection_corner.dds
Corner Normal Map dirt_intersection_corner_n.tga
Crosswalk Texture dirt_intersection_crosswalk.dds
Dirt Sidewalk
- Street Textures:
Base Texture dirt_street_base.dds
Detail Texture dirt_street_detail.dds - Sidewalk Textures:
Base Texture dirt_sidewalk_base.dds
Normal Map dirt_intersection_corner_n.tga
Opacity Map dirt_sidewalk_opacity.dds - Intersection Textures:
Corner Texture dirt_intersection_corner.dds
Corner Normal Map dirt_intersection_corner_n.tga
Crosswalk Texture dirt_intersection_crosswalk.dds
- Street Textures:
- Routing, Routing, Routing
- Good routing is critical to making your Sims walk, bike or drive in a realistic way and to giving people who are using your town a feeling that they are in a realistic setting. Road placement is only part of this, the other part is determining where the Sims and the camera can and cannot go.
- Painting an area with the Sims Non-Routable paint (shows up as blue paint) keeps Sims from walking places where they shouldn’t – like up the sides of mountains or into dense clusters of trees. The tool itself will keep Sims from routing underwater (it auto-paints Sims Non-Routable paint there on its own).
- Camera Non-Routable paint (shown as yellow) literally makes it so the in-game camera can’t go beyond certain points. This is great to paint around the outer edges of your town. If done right, and working with the placement of mountains, it keeps you from seeing off the edges of the map which will make your world seem more realistic. Be very careful to keep the edges of the Non-Routable paint smooth, so that your in-game camera doesn’t bounce around or get stuck.
- Lots of Lots
- Using The Sims™ 3 Create a World Tool – Beta you can draw lots ranging from 1x1 tiles to 64x64 tiles anywhere you desire in your town. These Lots are where you can build homes for your Sims, parks, place rabbitholes, etc.
- It’s best to keep lots lined up with roads to make routing look better and more realistic –that way, when Sims drive places, they get out of their car right in front of the lot instead of down the street and have to run a ways to get somewhere. You should alsotry to keep lots in each sub-division of your world lined up so that they look more cohesive (just like neighborhoods in the real world).
- Lots should be placed far enough away from tall terrain structures (such as mountains), to keep the camera from bouncing up the mountains when the users are playing on that lot.
- Make sure that you place your lots while thinking about the things discussed in step one (such as the number of Sims you want living in your neighborhood, the number of rabbitholes and venues, etc.,) so that you have enough lots to cover everything. It’s also best to only place one rabbithole per lot, so that each can have its own name and address.
- Keep in mind lot sizes when you’re creating lots for specific rabbitholes. Some of the rabbitholes are very large and require a large lot to place them (such as the Llama Memorial Stadium and City Hall) others are smaller (like the Specter Family Mausoleum) so you should make your lot sizes accordingly. Large lots are also much harder on performance, so players with lower-end computers will have a difficult time playing in your world if all the lots are huge. Lot spacing is also important for this same reason, if your lots are all right next to each other, players with low-end computers will see the low resolution versions many lots so their game won’t look as “pretty”.
- If you are sharing your world you should try to keep the majority of your lots flat and square so that others can import and export lots into them easier which will make your world more versatile.
- hink of cool street names and realistic addresses for the lots in your world as it helps keep the fiction going. Many cities in the world have a 0 point in a town where the North, South, East, West addresses move outward from, and they keep the addresses consistent with even numbers on one side of the road and odd numbers on the other.
- If you have a Lot set in a pretty location in your world, be sure to set the “Beautiful Vista” Buff on that lot so the Sims living or visiting that lot get the Moodlet in the game. You can also set each lot to cost more or fewer Simoleons by adding a positive or negative number in the Set Additional Property Value section in your Property Browser or Lot Information window.
- To build on your lots you must go into “Edit in Game” by pressing The Sims™ 3 plumbob button in the Utilities panel. This opens kind of a mini version of the game (there is no Live mode) where you can go into Edit Town and build on your lots just like you can in The Sims™ 3 game. You can also place buildings from your Library onto these Lots. Once you’ve finished editing your lots, be sure to save your world, then exit ”Edit in Game” to return to CaW.. Please keep in mind that it can take a very long time to save your game in “Edit in Game” if you have many lots in your world. You’ll know it’s working as the screen will blink each time that it saves a Lot.
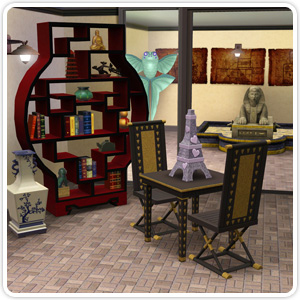
- Oodles of Objects
- Placing game objects is pretty straight forward once you know what the objects are. From fountains to rocket ships, there are plenty of objects to place to support all kinds of different-looking worlds. Most of the names are self-explanatory, but be mindful that there are a lot of rocks to choose from so don’t get confused.
- Some game objects are very specific and are meant to work together to create a larger object. An example of this is the Antique Train, Train Track Bridge, and the Train Tunnel – these can be put together to make a realistic train going through a mountain. Other examples are the Ruined Wall pieces and all the different fence pieces. There are other objects they have very specific placement, such as the Road Sewer which is a man hole cover to place on roads.
- Some very special objects are the Distant Terrain objects. These are objects that are used to place around the outer area of the town in order to give it a more realistic feeling. They are meant to be used on the largest map size (2048 x 2048), have a very specific placement for each (you should place the object then adjust the X, Y, and Z Positions and Rotations of it in the Property Browser window according to the numbers below), and the terrain needs to be raised and lowered to meet up with the edges of these very large objects.
Terrain – Distant:
Position X = 2047.11707 Y = 116.551254 Z = 2047.2146 Rotation X = 0 Y = 0 Z = 0 Distant Terrain – China:
Position X = 1025.91492 Y = -100.792183 Z = 1022.01959 Rotation X = 0 Y = -89.99999 Z = 0 Distant Terrain – Egypt:
Position X = 1000.6 Y = -2 Z = 1025.6 Rotation X = 0 Y = 44.1999931 Z = 0 Distant Terrain – France:
Position X = 1000 Y = 0 Z = 1012 Rotation X = -179.999985 Y = 0 Z = -179.999985 - Time for Trees
- Trees should be placed on their own layer in the World Layers section. The reason for this is optimization (making performance better). When you save your world, trees of the same type and on the same layer become “clustered” meaning that they become one object, which makes them work better on players machines. When they are clustered you can move them as one object or you can click the Uncluster Trees button to uncluster them and move them individually. When they are clustered you can click on the Move tool then CTRL-click on the trunk of one of the trees to snap them all to the ground.
- Be careful when moving tree clusters or large objects around in your world. It is easy to accidentally get them partially on Lots which will cause strange things to happen to the routing system. The on-Lot routing system is separate from the world routing system, so if there are world objects (game objects) placed on a lot, the Sims will route right through them as if they are not there. This looks strange and can ruin the realism of your world.
- Effective Effects
- Visual effects can be placed pretty much anywhere on your world and are great for adding “flavor” to your atmosphere. There are many general ones to choose from and a few that are very specific. The waterfalls and river rapids, for example, can be used when you want to make rivers that are higher than ocean level. The Ocean Surf is used to make waves in your water. The purple boxes that you see in The Sims™ 3 Create a World Tool – Beta is not seen in game.
- Spawning Time
- Spawners are a special type of Game Object that creates collectables in the worlds that your Sims can use. Each of the spawners has a ring around it indicating the area in which it affects. When a spawner is placed, objects of that type are created in the area and Sims can go and get them in game. There are also spawners available in the Buy Mode catalog when you’re in “Edit in Game” and use the TestingCheatsEnabled cheat and then the BuyDebug cheat. This opens up a category that contains spawners to place on the lots (including harvestable plants which cannot be placed on the world terrain).
- The water on your world terrain is automatically ocean water (unlike the water that is on Lots which is freshwater), so Sims can only catch saltwater fish. In order for your Sims to catch freshwater fish on the world terrain you have to place Freshwater spawners. There are a few very large freshwater spawners available in the Game Objects > Spawner list of the Metadata section of the tool (so you don’t have to place as many – lots of spawners aren’t very good for performance). There are also some large Ocean spawners available in the BuyDebug category in Buy Mode on the lots so that you can turn your on-Lot freshwater into saltwater.
- There are a few things to keep in mind when placing spawners. You don’t want to place too many of them – they have visual effects so they are pretty hard on performance, you want to place them in interesting and logical places so that players enjoy sending their Sims to get them and to make your world and your stories more interesting. You also want to place rarer spawners in harder to get to, or further away places so that players have a reason to go there.
- How to export your world and upload it to the Exchange or into your game
- Rebuild the routing data for your world by selecting View > Rebuild Routing Data in your tool. This is very important and will make sure that routing works properly for the lay of your land.
- Come up with a memorable names and description for your world – This is what will show up when users have downloaded and are selecting your world when they start a new game.
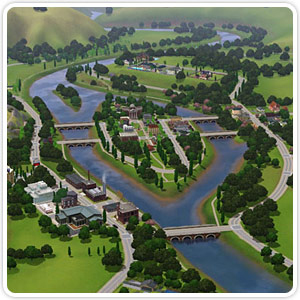
- Take a screenshot that shows off your world – more people will download it if they can visualize what kind of world they are downloading. This is also the picture that shows up in their game when users have downloaded and are selecting a world to play when starting a new game.
- Save your world! – CaW is a very powerful tool that holds a large amount of information for your world. It can sometimes take a long time to save your world both when in “Edit in Game” and in the tool itself.
- Export your world using the option in the File menu.
- To use the world that you’ve exported in your local game, just browse to the world file on your hardrive and double-click on it to install. When you next run The Sims™ 3 or The Sims™ 3 World Adventures and start a new game, you’ll be able to select that world to play in!
- To upload your world to The Sims™ 3 Exchange, just open your Launcher and select the world file to upload (just as you would a lot or family).
- How to add Sims into your world
- Currently, adding Sims to your world is done once your world is imported into The Sims™ 3 or The Sims™ 3 World Adventures. Once you’ve downloaded a world from the exchange or created your own world to play, simply start a new game and add the Sims just as you world for Sunset Valley or Riverview. The Sims can be downloaded from the exchange and placed from your game’s Library or created in CAS and then moved onto a lot. If you want to have specific Sim families in your town, it’s best to create all of the families and place them all in their lots before starting to play your game. You can also just add the family that you want to play and let Story Progression fill in the extra Sims for you!
- A couple of important things:
- SAVE THE WORLD! Save early, save often, and save a couple of backup copies. There are some things in the tool that are not undoable, so before you try something tricky you should save.
- Test the Waters – It’s important to test your world thoroughly to make sure there aren’t places where Sims can get stuck or places where Sims can’t get to. It’s also important that you make sure it’s fun!
- Be Patient – It takes a long time to build a large and robust world. Don’t get discouraged! If you’re getting frustrated with something in particular, move on to another section of the world and come back to it. This isn’t something that usually happens overnight – neither Rome nor Sunset Valley was built in a day :)
- Be Creative – Do something fun, something out of this world or something in this world, test the limits – just make sure that it’s fun and playable in the end!
I hope this helps get you started into the wild world of worldbuilding!
Cheers,
Rain